
This guide will only walk through the Duplicati section and not setting up B2 itself. This will assume you already have your B2 Credentials.
B2 is efficient up to about a TB for a consumer. Past that, there are more cost effective options. Feel free to reach out to us for a consult.
- Download and install Duplicati from https://duplicati.com/
- Once installed, it should open the web interface. If it doesn’t. Head to http://localhost:8200
- Click Add Backup
- Click Next
- Choose a name of your choosing. I commonly choose the name Cloud or B2
- Choose a strong password and make note. It cannot be reset.
- Click Next
- In the Dropdown for Storage Type, select B2 Cloud Storage
- Enter your Bucket Name
- You can leave the folder path blank or tell it a folder you want your files under (it will create for you)
- Enter the Application ID and Key
- Click Test to make sure it works
- Hit Next
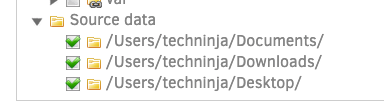
- Check off the folders to back up. You can us the user data folders or explicitly expand Computer >> Users >> Your user folder.
- I recommend Documents, Desktop, Downloads, Photos/Movies (if you’re not using Google Photos, Google Photos will be easier to find photos to restore)
- Expand Exclude, and check all the boxes.
- Hit Next
- Change the schedule if you like, otherwise defaults work well.
- Nit Next
- Change Backup Retention to either Smart Backup Retention or keep specific number. I like to commonly keep 2-3 versions.
- Click save, then run!

And Bam. You’re all set! Duplicati will automatically back up all files then changed versions. It offers encryption and de-duplication as well!


You must be logged in to post a comment.